Secure Boot is a feature that helps prevent unauthorized operating systems or malicious software from loading during the boot process of a computer. It ensures that only trusted software is loaded, providing an additional layer of security for your system. Enabling Secure Boot is essential for safeguarding your computer against potential threats. Here is a comprehensive guide on how to enable Secure Boot on various devices.
Credit: www.asus.com
Enabling Secure Boot on Windows Devices
If you are using a Windows-based device, such as a laptop or desktop computer, you can enable Secure Boot through the BIOS settings. Here are the steps to enable Secure Boot on Windows devices:
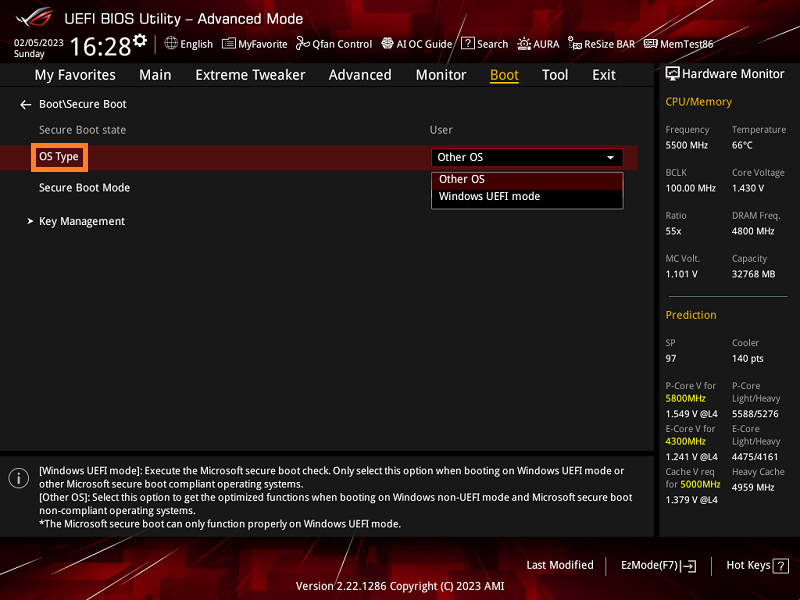
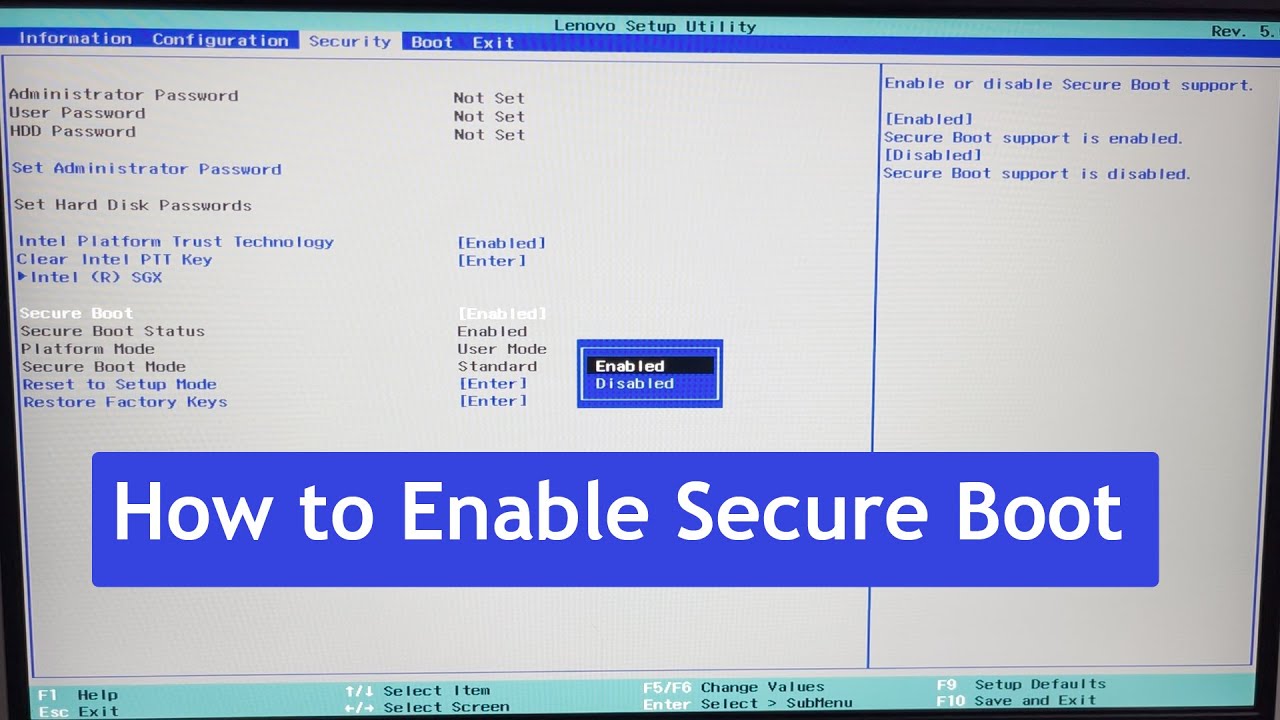
Step 1: Accessing The Bios
1. Restart your computer and press the BIOS key during the boot process. The BIOS key varies depending on the manufacturer (common keys include F2, F10, Del, or Esc).
Step 2: Navigating To Secure Boot Settings
1. Once in the BIOS settings, navigate to the “Security” or “Boot” tab using the arrow keys on your keyboard.
2. Look for the “Secure Boot” option and select it using the Enter key.
Step 3: Enabling Secure Boot
1. Change the Secure Boot option to “Enabled” by selecting it and pressing Enter.
2. Save the changes and exit the BIOS settings by pressing the appropriate key (commonly F10).
Step 4: Verifying Secure Boot
1. Restart your computer to ensure that Secure Boot is successfully enabled. You may see a Secure Boot logo during the boot process.
Enabling Secure Boot on Mac Devices
For Mac devices, the process of enabling Secure Boot is slightly different. Here is how you can enable Secure Boot on Mac computers:
Step 1: Accessing Startup Security Utility
1. Shut down your Mac and turn it back on while holding down Command + R to enter Recovery Mode.
2. Go to the Utilities menu and select Startup Security Utility.
Step 2: Enabling Secure Boot
1. In the Startup Security Utility, select “Full Security” to enable Secure Boot on your Mac.
2. You may be required to authenticate using your administrator password.
Step 3: Verifying Secure Boot
1. Restart your Mac to ensure that Secure Boot is successfully enabled. Your Mac will now boot into a more secure environment.
Benefits of Secure Boot
Enabling Secure Boot offers several benefits, including:
- Protection against unauthorized operating systems
- Prevention of rootkits and other malware
- Enhanced system security
- Secure boot environment
By enabling Secure Boot, you can significantly reduce the risk of security breaches and ensure that your computer boots securely each time.
Credit: softkeys.uk
Frequently Asked Questions
How Can I Enable Secure Boot On My Computer?
To enable Secure Boot on your computer, access the BIOS settings and navigate to the Secure Boot option. Select “Enabled” and save changes.
What Is Secure Boot?
Secure Boot is a security feature that ensures that only trusted software is loaded during the boot process.
Why Is Secure Boot Important?
Secure Boot helps protect your computer against malware and other security threats by ensuring that only trusted software is loaded during bootup.
How Do I Know If Secure Boot Is Enabled On My Computer?
You can check if Secure Boot is enabled on your computer by accessing the BIOS settings and looking for the Secure Boot option.
Conclusion
Enabling Secure Boot is a crucial step in enhancing the security of your computer. By following the steps outlined in this guide, you can easily enable Secure Boot on your Windows or Mac device. Remember to regularly update your system to ensure that you are protected against the latest threats. Secure Boot provides an additional layer of security that can help safeguard your system and data from potential attacks.
Take control of your system’s security today by enabling Secure Boot and enjoy peace of mind knowing that your computer is protected against unauthorized access and malicious software.
To further understand your concerns about caffeine in Monster, check out our article: “How Much Caffeine in Monster: Unleash the Shocking Facts!”


One Comment